
Are you struggling with factory rims sitting too far inside your fenders? Upgrading your vehicle stance frequently involves finding flawless C5 Corvette Wheels alongside testing various track width modifications. Correctly installing spacers fixes awkward fitment perfectly while keeping your aggressive ride completely stable and smooth.
Some Things To Keep In Mind
§ Hub-centric spacers with a 70.3mm bore will take care of vibrations at high speeds. Lug-centric spacers simply won’t do on a Corvette.
§ The 6 turn rule is a rule that must be followed. Otherwise, you’re inviting a disaster to happen. Each lug nut must be turned at least 6 to 8 full turns before it is in place.
§ Torque to 100 lb-ft using a star pattern and re-check after 50 miles. Spacers settle and can loosen.
§ There are no ‘multi fit’ spacers here. We’ve seen them snap under cornering force, particularly on track days with gloop on the tyres.
Core Concepts
– To keep your C5 safe, you must use hub-centric spacers that have a 70.3mm center bore, 5×120.65 bolt pattern, and at least 6 to 8 full turns of lug nut engagement.
– Slip-on spacers greater than 5mm require longer wheel studs (ARP 100-7708 are the standard). Bolt-on adapters require a 100 lb-ft torque, with a retorque after 50 miles.
– The lowest cost insurance against the dreaded 70 mph steering shake is a wire brush and brake cleaner on the hub mating surface.
Safely Installing C5 Corvette Wheel Spacers
Safely installing C5 Corvette wheel spacers is a question that many car enthusiasts have. This is a complete guide to the theory and application of changing your Corvette’s track. Allow approximately 2 hours for a first-time user.
Step 1: Scrub The Hub And Wheel Mating Surfaces
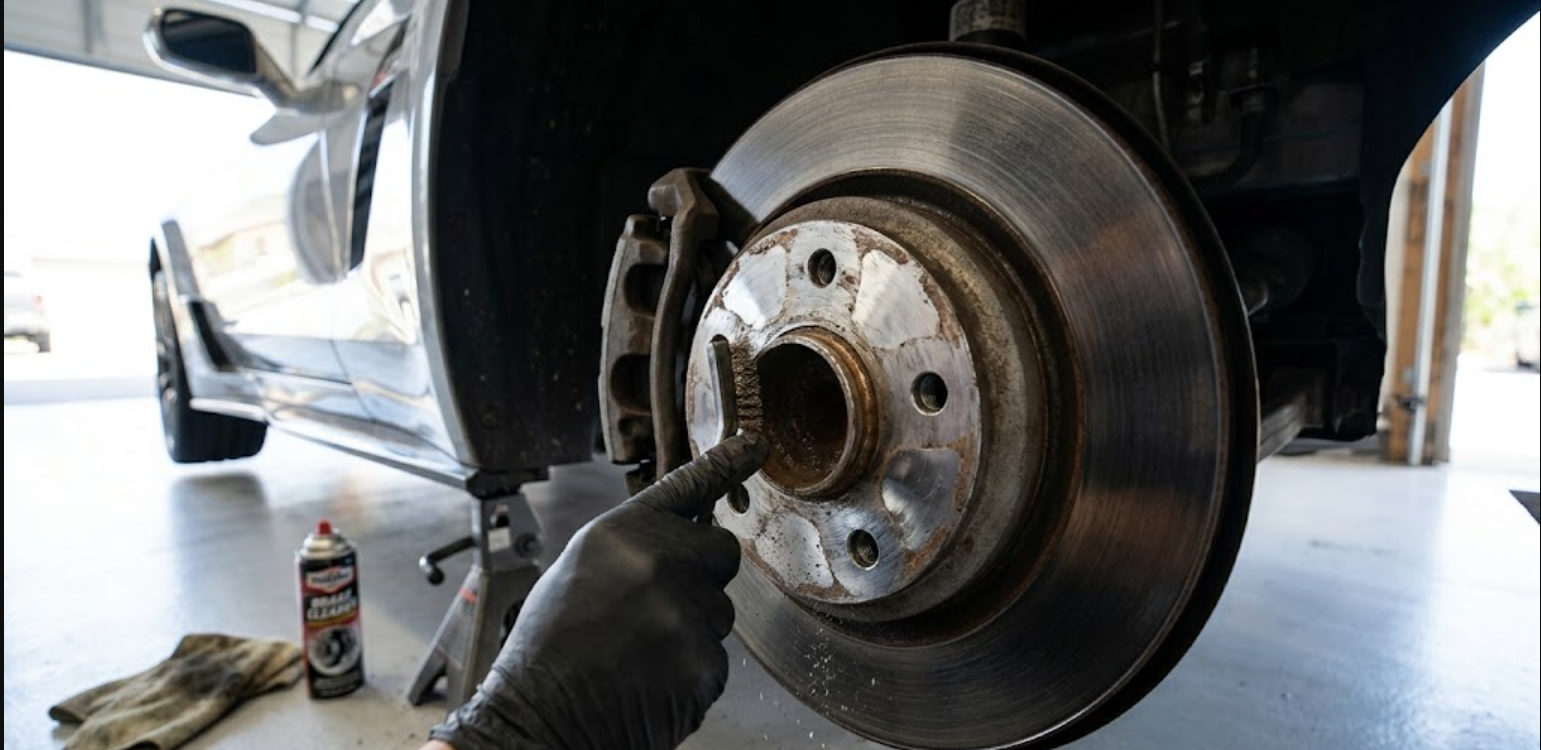
The uneven clamping force comes from rust, old brake dust, or road grime between the hub and spacer (or spacer and wheel). This is why it inevitably results in vibration. Before mounting anything, the surface should be clean, dry, and bare metal.
If there is any sort of high spot due to a single grain of rust between the hub and spacer, the spacer will not sit flush. The wheel will never clamp evenly. The end effect is a lateral runout that you’ll notice as a steering shimmy at approximately 60 to 70 mph.
On a car, the unsymmetrical loading cycles the wheel studs, and eventually leads to metal fatigue. It’s the #1 cause of post-install wobble.
Preparation & Lifting Safety
§ While the car is on the ground, chock the back wheels and loosen the front (half turn) lug nuts.
§ Use a good floor jack to jack up the front end and place it on rated jack stands. Never work under a Corvette that is on a hydraulic jack alone.
§ Carefully remove the wheel to ensure that the barrel does not drag on your brake calipers. Place the wheel in a safe place.
How To Get A Bare-Metal Finish?
§ Use a wire brush to attack the face of the hub. Thoroughly clean the entire mounting surface, with special attention to the center lip where the spacer fits. Brush until you are able to see shiny, bare metal.
§ Use the same brush to clean the center bore and inside mounting pad of the wheel. Brake cleaner sometimes can aid in the elimination of stubborn carbon and brake dust deposits.
§ Dry everything with a microfiber rag thoroughly dampened with brake cleaner. Make sure to remove any oily residue and allow it to dry.
Step 2: Select & Check The Correct Spacers
The essence of what he’s saying is simple: a hub-centric design is the only thing to work on a Corvette. The spacer needs to be of the same center bore (70.3mm) and fit snugly on the hub lip. Lug-centric ‘universal’ spacers attempt to be centered through studs only.
That is a recipe for vibrations and fatigued studs – period! The cost of $150 for high quality hub-centric parts from a good brand is far less than replacing a sheared hub or a damaged fiberglass fender.
Spacer Specification Verification
Verify and measure bore size carefully. Use calipers to measure the center hole of the spacer or check the spacer for the stamp “70.3mm”. Do not use if it is sloppy or loose on the hub lip. Double check that the bolt pattern is 5×120.65 (or 5×4.75 inches).
It’s a non-negotiable measurement for General Motors cars of this time period. Check thickness for your particular use. Slip on spacers under 5mm are safe with the standard studs.
Spacers thicker than 5mm should definitely have longer studs. If you upgrade to Multi-Spoke Wheels for Corvette, verifying thickness becomes even more crucial.
| Specification | Requirement for C5 Corvette |
| Center Bore | 70.3mm |
| Bolt Pattern | 5×120.65 (5×4.75″) |
| Thickness Limit (Stock Studs) | 5mm Maximum |
The Integrity Of Materials And Structures
Carefully check the quality of the materials. Say goodbye to the low-cost, multi-fit cast aluminum spacers from generic auction sites. Look for aerospace grade aluminum billet, such as 6061-T6 or 7075-T6.
Forced spacers or spacers made from billet stock from Eibach, H&R, or AMT Motorsport are popular with track day enthusiasts. Don’t use multi-drilled slots that weaken the spacer under the tremendous lateral load a Corvette puts on it in high-G cornering. Pairing high-quality spacers with Rizo Forged Custom Alloy Wheels Satin Silver guarantees structural integrity.
Step 3: Test Fit No Lug Nuts

Please place the spacer on the hub prior to torquing, and hang the wheel on the studs by hand. No lug nuts yet. This dry test will check to determine whether the factory studs extend beyond the spacer face and touch the mounting pad of the wheel.
That’s a usual annoyance that comes with 20mm bolt-on spacers. The studs protrude and hit the back of the wheel, so it doesn’t fit flush.
To Perform The Dry Fit
§ Carefully slide the spacer on to the hub. It should be installed over the center lip and have no radial clearance. If it is rocking or moves laterally, the bore machining is wrong.
§ Place the wheel on the studs and gently push it against the spacer face. Take a close look at the space between the wheel and spacer, and check the tips of the studs.
§ Look for studs that are protruding beyond the spacer. If the studs do not fit inside the spacer face, get a larger spacer, open-ended (deep wheel pocket) wheel nuts, or change to extended studs.
Testing The Flush Mount With A True/False Test
§ Look for the factory reliefs or “pockets” between the wheel holes in the back of the wheel pad. There are some Corvette wheels that have cavities that can hold the protruding studs.
§ A proper mating surface is achieved if the wheel is completely flat and the stud threads are completely within the spacer or into wheel pockets.
§ Before continuing, check the visual clearance around the brake calipers and suspension geometry.
Step 4: If Necessary, Change To Extended Wheel Studs
On spacers with greater than 5mm diameter, the stock studs just will not provide sufficient thread engagement for the slip-on. The industry standard studs for a C5 Corvette are ARP 100-7708 studs.
They are made from chromoly steel, which is much stronger than OEM hardware, and long enough to securely engage the nuts.
Removing Factory Studs
§ Completely remove brake parts. While the hub remains on the car, remove the brake caliper, caliper bracket, and the brake rotor to reveal the bare hub flange.
§ Carefully squeeze out the old studs. Place the sacrificial lug nut on a stud and hit it out with a heavy dead blow hammer, or preferably a special ball joint/stud press that will not put shock load on the wheel bearing.
§ Check the hub flange splines in which the new stud will slide to make sure they are not stripped or damaged. Use a cylindrical wire brush to clean the hole.
Installing Extended Hardware
§ Thread the ARP studs in from the back of the hub flange. Make sure they are in line before pulling.
§ Use a mechanical advantage for seating. Use a pile of grade 8 washers and the old lubricated lug nut to draw the stud in to the flange.
§ Continue to tighten the nut until the head of the stud is firmly and completely flush against the back of the hub. Applying heavy torque may be necessary.
§ Reassemble the rotor and caliper, making sure that the long studs do not obstruct the ABS sensors or dust shields.
Step 5: Correctly Mount Spacer And Wheel

Let’s get down to the big game. Each lug must spin 6-8 full turns until the nut comes to rest against the wheel. It is as shallow as you can get it, and less than that is dangerously shallow.
More than 80 percent of the clamping load is on the first few threads. That is no small change. If applied with a lot of pressure, such as in a corner or on the brakes, the shallow threads will either strip or break off completely.
Securing The Assembly
§ Carefully position the spacer against the hub. If it is a bolt-on style adapter, start by torquing all internal nuts to 100 lb-ft, strictly in a star pattern.
§ Carefully hang the wheel onto the extended studs or spacer studs, without the heavy aluminum wheel barrel damaging threads.
§ Install each lug nut by hand to avoid the possibility of cross-threading the studs (aggressive pitch angles make this easy).
Weaves Per Inch And Checker
§ Very carefully count the manual turns. Stop at once if the lug nut cannot be turned 6 complete 360-degree turns. Longer studs or another spacer arrangement is required.
§ Use open-ended lug nuts for the best visual inspection. Track day guys often use open-ended steel lug nuts, since they allow you to visually check the engagement of thread.
§ Use a hand ratchet to snug all nuts down. The wheel should be completely centered on the hub lip; don’t use full torque while the wheel is off the ground.
Step 6: Torque In A Star Pattern To 100 Lb-Ft Then Re-Torque After 50 Miles
The steel studs and aluminum spacers expand and contract at different rates, and settle after a few heat cycles created by your brakes. Without the post drive re-torque, the lug nuts can work loose just enough to create a loose wheel.
The spacer collapses a little, the load of the lug nuts decreases, and the wheel begins to wobble. Under extreme conditions, a stud can unscrew all the way out and shear.
The Initial Torque Sequence Is Said To Be Of Vital Importance
§ Lower the car so that the tire is just able to contact the ground so that the wheel does not spin, but does not load the un-torqued studs.
§ Zero in your calibrated torque wrench to the factory General Motors torque value for the C5 Corvette wheel lugs: 100 lb-ft.
§ Complete a tight star pattern: up, left down, right up, right down, left up. It will make sure the wheel is being pulled flat against the spacer.
§ Do a 2-pass torque method. Make the initial pass on all lugs at 50 lb-ft and follow with the second pass at 100 lb-ft.
A 50-Mile Re-Torque Mandate
§ Fully lower the car to the ground and remove the jack and all safety stands.
§ Drive moderately for about 50 miles, allowing the suspension to cycle and the brakes to put thermal heat into the aluminum spacers and steel studs.
§ Re-check all the lug nuts at 100 lb-ft after a light cool down. It’s perfectly normal to find some that have turned a quarter turn.\
Step 7: Road Test And Listen For Trouble

Withdraw it from the car but watch carefully. The C5 Corvette’s steering is very communicative, and the steering wheel should be dead smooth until 70 mph. If there is any shake, and particularly if it changes with speed, something is not in place, or the spacer is not round.
Staged Speed Testing
§ First cruise at 30 mph on a freshly paved, smooth road. Be ready to apply light pressure to the steering wheel and notice any vibration or oscillation in the seat at low speeds.
§ Gradually increase speed to 60, then 70 mph. When the shake is only present at a specific speed and then goes away, it is almost certainly a rotational imbalance.
§ Take action to intense vibrations. Any ‘death wobble’ in the chassis at 70 mph is a signal to safely stop the car. Do not attempt to drive through it.
Acoustic Diagnostics
§ Do some moderate corners to load the suspension sideways.
§ Carefully listen for clicking or clunking coming from the hub area during load transfer. That means in particular that the stud is moving or the wheel is moving relative to the spacer.
§ If noises are heard, re-inspect the seating surfaces. There may be a particle of dirt that creates a high spot that can be brushed off.
Solutions To Typical Wheel Spacer Issues
The majority of wobbling is caused by dirt between surfaces, incorrect bore size, or lack of thread engagement. First, try the easiest repairs: clean hub, check for proper spacer fit, and perform that thread count.
| Common Symptom | Probable Cause | Recommended Quick Fix |
| Highway Steering Shake | Hub centricity problem or dirt | Remove, clean to bare metal, re-mount |
| Wheel Bolts Bottom Out | Acorn lug nuts are too short | Switch to open-ended lug nuts |
| Spacer Misaligned on Hub | Burr or machining defect | Sand hub lip with fine emery cloth |
- If Steering Play Is Noticed At Highway Speeds:9 times out of 10, it is a hub centricity problem. The spacer may not be completely into the hub lip, or perhaps you bought a lug centric spacer. Remove, clean to bare metal, and re-mount. If this still doesn’t help, check the centrebore of the spacer with a digital caliper, as it may be slightly out of tolerance because of poor manufacturing.
- Wheel Bolts Bottom Out:With closed-end “acorn” type lug nuts, a bolt-on spacer might cause the stud to bottom out in the nut before it is firmly secured. Use open-ended nuts or cut down the studs slightly (if it is safe to do so).
- Spacer Is Misaligned On The Hub:Most likely a burr is on the hub lip, or a defect in the machining of the spacer bore. Use fine emery cloth to sand the top of the car’s hub a little, until the spacer can be moved in without tilting.
- Lug Nuts Continue To Loosen After Re-Torquing:This may be because the studs have been over torqued in the past and are now stretching past their yield limit. A calibrated torque wrench should be used which has previously been checked for accuracy. If the issue does not clear, look for micro-cracks around the holes for the studs in the aluminum spacer itself.
People Also Ask
Wheel Spacers For A C5 Corvette – Are They Safe?
Yes, but only if they are indeed “hub-centric” and are made from good quality forged/billet aluminum and set correctly with the correct thread engagement. Loose, lug-centric, or cheap cast multi-fit spacers will fail to cope with the heavy cornering that a Corvette can do.
Make sure that the torque wrench is calibrated and do not exceed the 6-turn rule. Spacers are perfectly safe when installed correctly and are part of an overall suspension system! Investing in tailored Custom Forged Wheels often solves fitment issues permanently.
What Is The Largest Spacer Thickness That Can Be Used Without The Extended Studs?
As a general rule, 5mm slip on spacers are the absolute max with stock C5 Corvette wheel studs. More than 5mm significantly decreases the engagement below the minimum safe value. If the spacer is thicker than 5mm, the inclusion of ARP or equivalent high tensile extended studs is required for safety reasons.
Do Spacers Lead To Bad Wheel Bearings?
They can make it wear a little faster, but not necessarily to a disastrous degree in the short term. Outward push of wheel centerline by spacers changes scrub radius. A little (10mm-15mm) will not hurt right off the bat, but any wheel forcefully pushed 20mm or more is considered mechanical load for the front wheel hubs.
C5 Corvettes are already notorious for failing their front hub assemblies under track conditions, so if you’re using the aggressive spacers, be prepared to check and replace your SKF wheel bearings slightly sooner than stock.
Are Spacers Allowed For Track Days And HPDE Events?
Yes, many High-Performance Driver Education (HPDE) instructors and track enthusiasts use spacers, but they require a specific setup; ARP quality studs, forged slip-on spacers, open ended lug nuts, and frequent torque checks between track sessions.
Bolt-on adapters with built-in studs are not recommended for heavy track use as the aluminum threads in which the adapters’ studs are inserted are softer and more likely to fail under high heat and high G loads. If the vehicle is tracked, use only slip-on spacers and solid steel studs.
Conclusion
Properly installing spacers transforms your vehicle stance while maintaining absolute safety everywhere. Precision engineering ensures zero fast vibrations forever. Choosing the correct C5 Corvette Wheels also drastically improves overall handling dynamics on challenging roads. Browse RizoForged today to securely explore premium bespoke options and elevate your ride with forged designs built for maximum track performance.
 EN
EN  ES
ES  PL
PL  JA
JA  IT
IT